The Power of a Windows 11 Repair USB: Rescuing Your Operating System
Related Articles: The Power of a Windows 11 Repair USB: Rescuing Your Operating System
Introduction
In this auspicious occasion, we are delighted to delve into the intriguing topic related to The Power of a Windows 11 Repair USB: Rescuing Your Operating System. Let’s weave interesting information and offer fresh perspectives to the readers.
Table of Content
The Power of a Windows 11 Repair USB: Rescuing Your Operating System

In the digital world, operating systems are the foundation upon which our computing experiences are built. Windows 11, the latest iteration of Microsoft’s flagship operating system, boasts a refined interface, enhanced security features, and improved performance. However, like any complex software, it can sometimes encounter issues, leading to frustrating errors, system crashes, or data loss. This is where a Windows 11 repair USB comes into play, offering a powerful tool to diagnose and resolve these problems, effectively rescuing your operating system from the brink.
Understanding the Importance of a Repair USB
A Windows 11 repair USB is essentially a bootable drive containing essential system files and tools necessary to repair or reinstall Windows. It acts as a lifeline, allowing you to access a recovery environment even when your main operating system is unable to boot. This makes it an invaluable resource for addressing a wide range of issues, including:
- Boot Errors: When your computer fails to start properly, a repair USB can help diagnose and fix the underlying problems.
- System File Corruption: Damaged system files can lead to various errors and instability. A repair USB can replace these corrupted files with fresh copies, restoring system integrity.
- Software Conflicts: Incompatible or faulty software can disrupt your operating system. The repair USB provides a way to troubleshoot and resolve these conflicts.
- Malware Infection: Viruses and other malicious software can severely damage your system. A repair USB can help remove malware and restore your computer to a clean state.
- Hardware Issues: While not a primary solution for hardware problems, a repair USB can assist in diagnosing and potentially resolving some hardware-related issues affecting your operating system.
Creating a Windows 11 Repair USB: A Step-by-Step Guide
Creating a repair USB is a straightforward process, requiring a few simple steps:
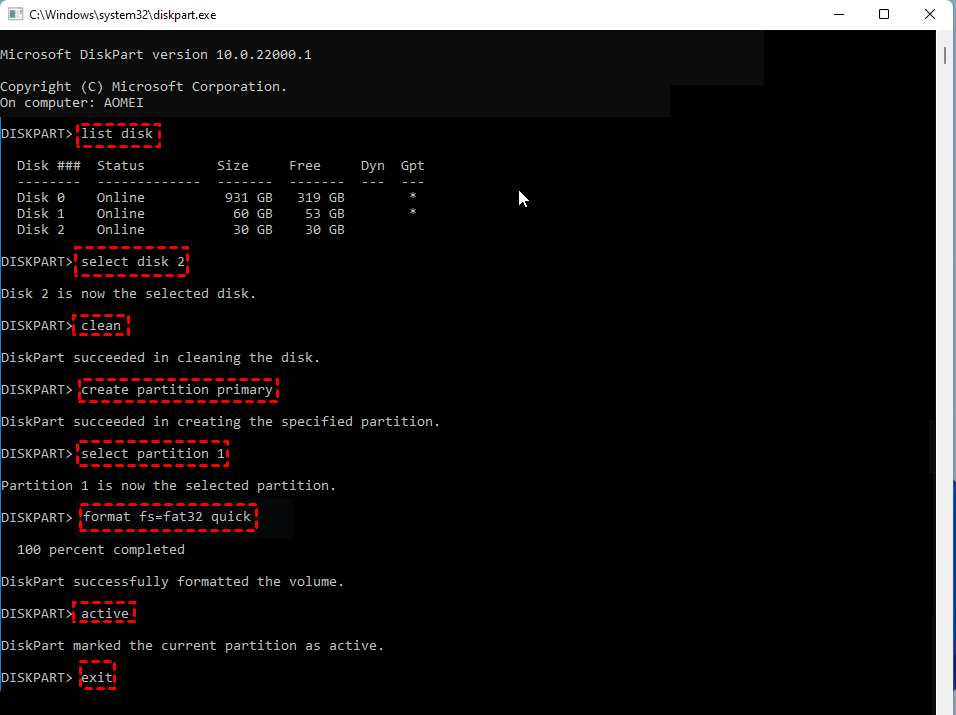
- Prepare a USB Drive: Ensure the USB drive has sufficient storage space (at least 8 GB) and is formatted as FAT32.
- Download the Windows 11 Installation Media: Visit the official Microsoft website and download the Windows 11 installation media creation tool. This tool allows you to create a bootable USB drive containing the necessary files.
- Run the Tool and Select USB Drive: Launch the downloaded tool and follow the on-screen instructions. Choose "Create installation media for another PC" and select the USB drive as the destination.
- Download and Install the Files: The tool will download the necessary Windows 11 files and create the bootable USB drive. This process may take some time depending on your internet connection speed.
- Verify the USB Drive: Once the process is complete, verify that the USB drive is bootable by restarting your computer and accessing the BIOS settings. Configure the boot order to prioritize the USB drive.
Using the Repair USB to Troubleshoot Windows 11
Once you have created the repair USB, you can use it to troubleshoot various Windows 11 issues:
- Boot from the USB Drive: Restart your computer and access the BIOS settings. Configure the boot order to prioritize the USB drive. This will launch the Windows 11 setup environment.
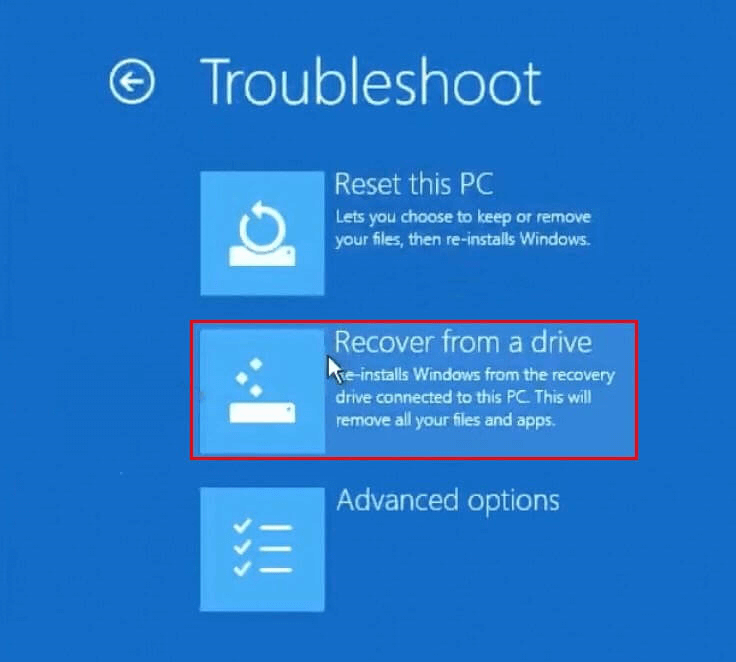
- Select Repair Options: During the setup process, you will see several options. Choose "Repair your computer" to access the recovery environment.
-
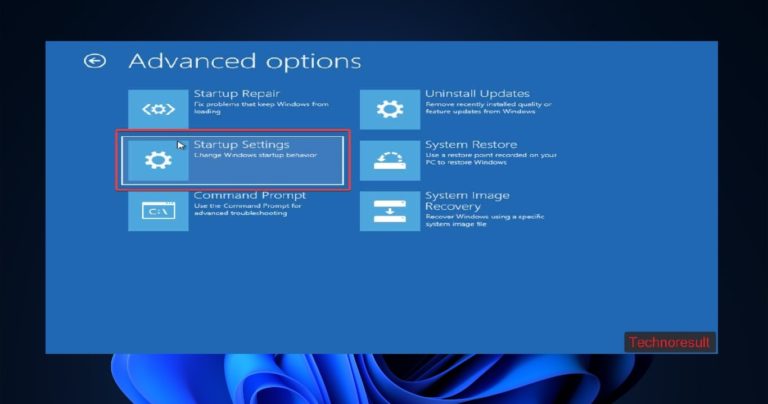
Troubleshoot and Repair: The recovery environment offers various tools to diagnose and fix Windows 11 issues:
- Startup Repair: This tool automatically scans and fixes common boot errors.
- System Restore: Allows you to restore your system to a previous working state, potentially undoing recent changes.
- Command Prompt: Provides a command-line interface to perform advanced troubleshooting and repair tasks.
- System Image Recovery: Enables you to restore your entire system from a previously created image backup.
Frequently Asked Questions (FAQs)
Q: What if I don’t have a USB drive?
A: You can create a repair USB using an external hard drive or a DVD. However, USB drives are generally more convenient and widely available.
Q: Can I use the repair USB to upgrade Windows 11?
A: No, the repair USB is primarily for troubleshooting and reinstalling Windows 11. It cannot be used for upgrading from an older version of Windows.
Q: Will using the repair USB erase my data?
A: Depending on the chosen repair option, data loss may occur. It is highly recommended to back up your important data before using the repair USB.
Q: Can I use the repair USB on multiple computers?
A: Yes, the repair USB can be used on different computers running Windows 11. However, it is advisable to create a separate repair USB for each computer to avoid potential compatibility issues.
Tips for Using a Windows 11 Repair USB
- Backup Your Data: Before attempting any repairs, always back up your important data to prevent accidental loss.
- Understand the Repair Options: Familiarize yourself with the available repair options and their potential consequences before proceeding.
- Use the Command Prompt Carefully: The Command Prompt is a powerful tool, but it requires a good understanding of commands. If unsure, seek assistance from a technical expert.
- Keep the Repair USB Updated: As Windows 11 receives updates, it’s essential to update the repair USB to ensure compatibility and access to the latest fixes.
Conclusion
A Windows 11 repair USB is a vital tool for any Windows 11 user, offering a reliable and efficient way to troubleshoot and resolve a wide range of operating system issues. By understanding its importance and mastering its usage, you can ensure a smooth and stable computing experience, minimizing downtime and protecting your valuable data. Remember to create a repair USB and keep it readily available, so you are prepared to tackle any challenges that may arise with your Windows 11 system.
![USB Device Not Recognized Windows 11 FIX [Solution] - YouTube](https://i.ytimg.com/vi/D9i1jD9BQgA/maxresdefault.jpg)

![How to Repair Windows 11 and Fix Corrupted Files [2024 Guide] - EaseUS](https://www.easeus.com/images/en/data-recovery/drw-pro/repair-windows-11.png)
Closure
Thus, we hope this article has provided valuable insights into The Power of a Windows 11 Repair USB: Rescuing Your Operating System. We thank you for taking the time to read this article. See you in our next article!