Restoring Your System: A Guide to Reinstalling Windows 11
Related Articles: Restoring Your System: A Guide to Reinstalling Windows 11
Introduction
In this auspicious occasion, we are delighted to delve into the intriguing topic related to Restoring Your System: A Guide to Reinstalling Windows 11. Let’s weave interesting information and offer fresh perspectives to the readers.
Table of Content
Restoring Your System: A Guide to Reinstalling Windows 11
![[GUIDE] How to Reinstall Windows 11 Very Easily & Quickly (Download) - YouTube](https://i.ytimg.com/vi/vsScvaNXQa4/maxresdefault.jpg)
The need to reinstall Windows 11 can arise for various reasons: performance issues, malware infection, a desire for a clean slate, or simply to troubleshoot a persistent problem. While it may seem daunting, reinstalling Windows 11 is a straightforward process that can revitalize your computer and resolve numerous issues. This comprehensive guide will provide a step-by-step explanation, covering essential preparation, download methods, and post-installation steps.
Understanding the Importance of a Clean Installation
Reinstalling Windows 11 offers several advantages:
- Enhanced Performance: A fresh installation eliminates unnecessary files, temporary data, and outdated programs, leading to a noticeable improvement in system responsiveness and overall performance.
- Resolution of Persistent Issues: Reinstalling Windows can address various problems like software conflicts, driver issues, and malware infections that resist traditional troubleshooting methods.
- Clean Slate for Troubleshooting: A fresh installation provides a controlled environment for identifying and resolving software conflicts or hardware incompatibilities.
- Security Enhancement: Reinstalling Windows eliminates potential security vulnerabilities associated with outdated software and accumulated data, ensuring a more secure computing environment.
Preparation: Ensuring a Smooth Reinstallation
Before embarking on the reinstallation process, it is crucial to prepare adequately. This involves:
- Data Backup: Back up all essential data, including documents, photos, music, and important files, to an external hard drive, cloud storage service, or USB drive. This step is critical to prevent data loss during the reinstallation process.
- Software Licenses: Gather all software licenses and product keys for programs you wish to reinstall after the fresh installation.
- Device Drivers: If possible, download the latest device drivers for your computer’s hardware components from the manufacturer’s website. These drivers will ensure proper functionality after the reinstallation.
- Create a Recovery Drive: Create a bootable USB drive with Windows 11 installation files. This drive will be used to initiate the reinstallation process.
Downloading Windows 11: Your Options
There are two primary methods for acquiring the Windows 11 installation files:
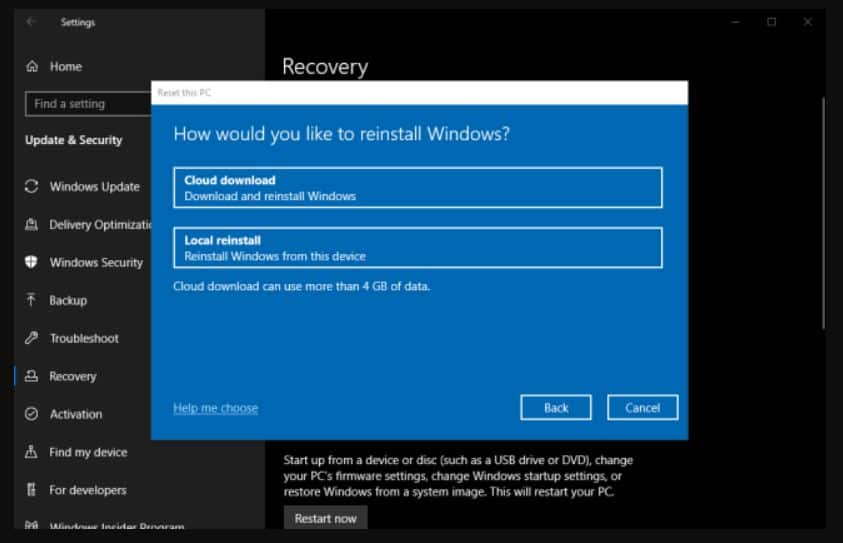
- Using the Media Creation Tool: This official tool provided by Microsoft allows you to create a bootable USB drive or ISO file containing the Windows 11 installation files. You can download the Media Creation Tool from the official Microsoft website.
- Downloading the ISO File Directly: If you prefer a more direct approach, you can download the Windows 11 ISO file directly from the Microsoft website. However, ensure you download the correct version for your system’s architecture (32-bit or 64-bit).
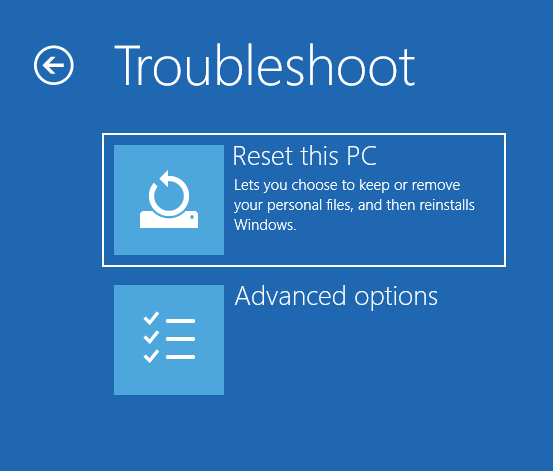
Reinstallation Process: A Step-by-Step Guide
Once you have your bootable USB drive or ISO file, you can begin the reinstallation process:
- Boot from the USB Drive: Restart your computer and access the BIOS settings. Configure the boot order to prioritize booting from the USB drive.
- Start the Installation: Follow the on-screen prompts to initiate the Windows 11 installation. You may be asked to choose your language, keyboard layout, and other preferences.
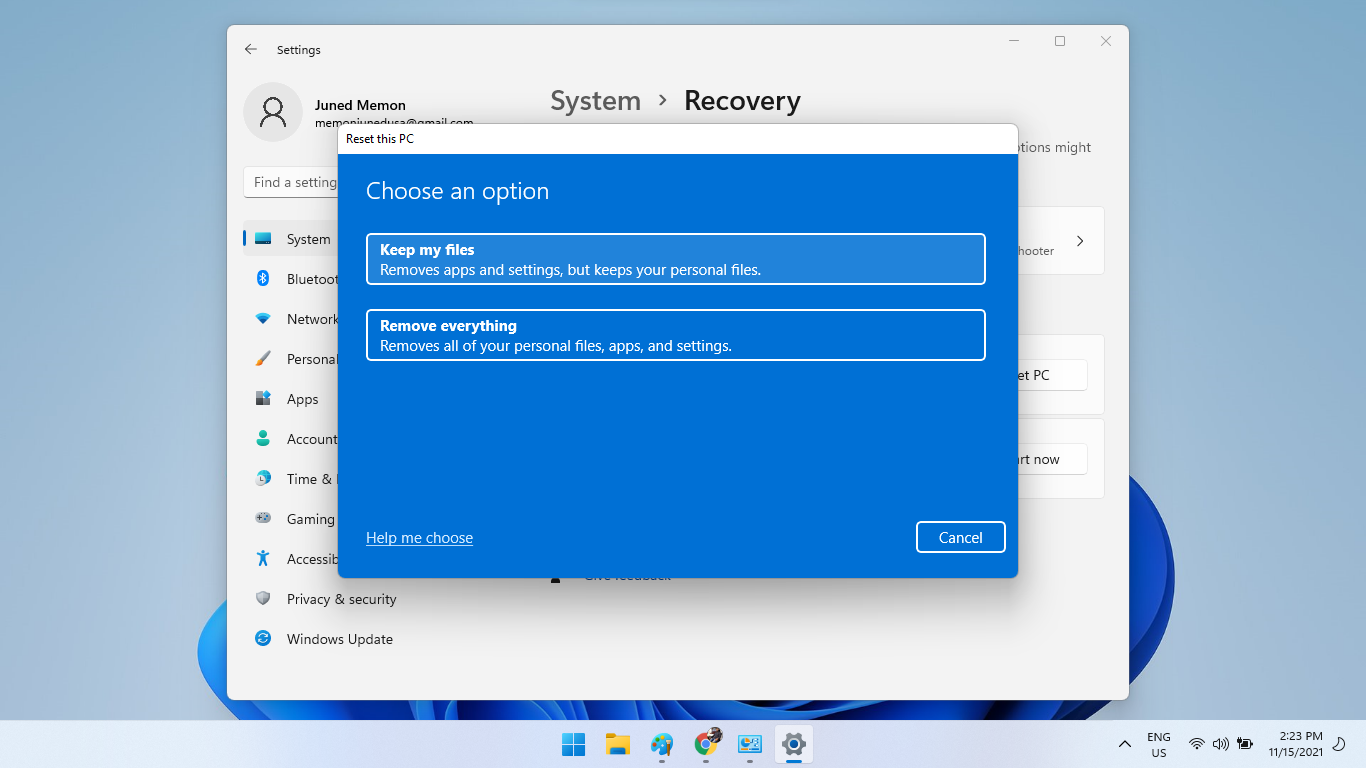
- Select Custom Installation: Choose the "Custom: Install Windows only (advanced)" option to perform a clean installation.
- Format the Hard Drive: Select the hard drive where you want to install Windows 11 and format it. This will erase all data on the drive, so ensure you have completed your backup.
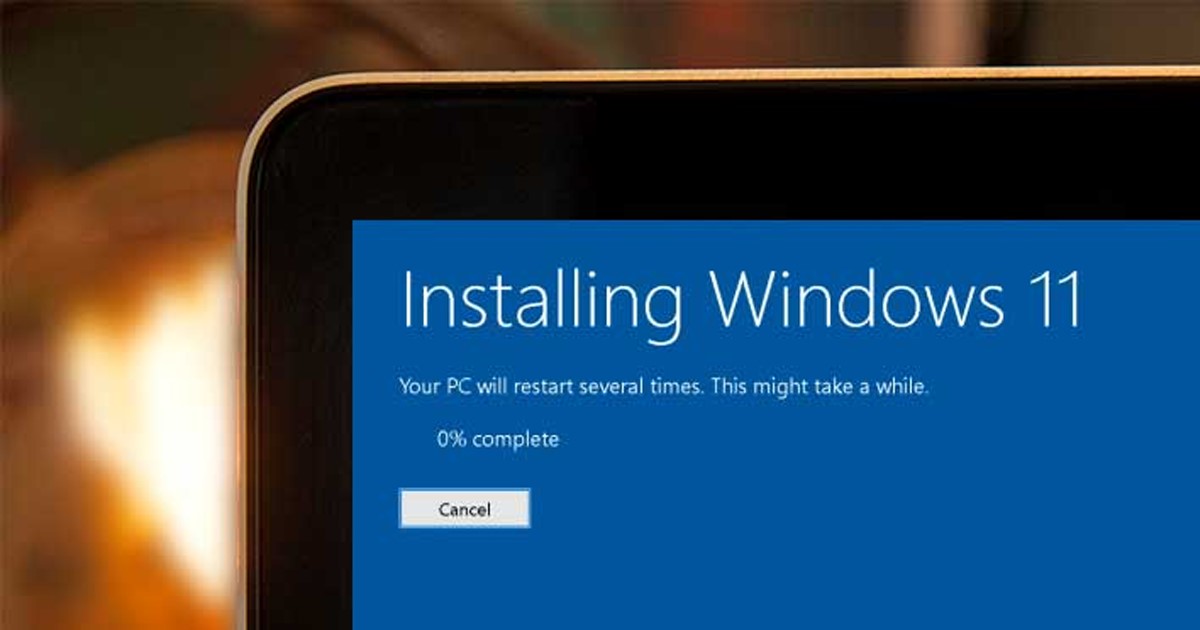
- Install Windows 11: The installation process will begin, copying files and configuring the system. This may take some time depending on your computer’s hardware.
- Complete Setup: Once the installation is complete, you will be guided through the initial setup process, including creating user accounts, setting up Wi-Fi, and customizing your preferences.
Post-Installation: Essential Steps
After completing the Windows 11 installation, several steps are crucial to ensure a smooth transition:
- Install Drivers: Install the device drivers you downloaded earlier to ensure proper functionality of your hardware components.
- Install Software: Reinstall your essential software applications, using the licenses and product keys you gathered beforehand.
- Update Windows: Run Windows Update to download and install the latest updates and security patches.
- Check for Updates: Check for updates for all your installed software applications to ensure optimal performance and security.
FAQs: Addressing Common Questions
Q: Can I reinstall Windows 11 without losing my data?
A: No, a clean installation will erase all data on the hard drive where you install Windows 11. It is crucial to back up your data before starting the reinstallation process.
Q: Do I need a product key to reinstall Windows 11?
A: Yes, you will need a valid Windows 11 product key to activate the operating system after reinstalling. The product key is usually associated with your computer and can be found on a sticker attached to your device or in your purchase confirmation email.
Q: Will reinstalling Windows 11 void my warranty?
A: Reinstalling Windows 11 should not void your warranty. However, it’s always a good idea to consult your manufacturer’s warranty documentation for specific information.
Q: What if I encounter errors during the reinstallation process?
A: If you encounter errors, try restarting the installation process or consulting Microsoft’s support website for troubleshooting steps. You can also seek assistance from a qualified technician.
Tips for a Seamless Reinstallation
- Create a Recovery Drive: Create a bootable USB drive with Windows 11 installation files before starting the reinstallation process. This will provide a backup option in case of unexpected issues.
- Disconnect Unnecessary Devices: Disconnect external devices like printers, scanners, and USB drives during the reinstallation process to avoid potential conflicts.
- Check for Compatibility: Ensure that your hardware components are compatible with Windows 11 before starting the reinstallation process.
- Be Patient: The reinstallation process can take some time, especially if you have a large hard drive or a slow internet connection.
Conclusion: A Fresh Start for Your Computer
Reinstalling Windows 11 can be an effective solution for various computer-related issues. By following the steps outlined in this guide, you can perform a clean installation, restore your system’s performance, and enhance its security. Remember to back up your data, gather software licenses, and download essential drivers before embarking on the reinstallation process. With proper preparation and careful execution, you can enjoy a refreshed and revitalized computing experience.
![Reinstall Windows 11 With 2 Easy Steps [Clean Install]](https://cdn.windowsreport.com/wp-content/uploads/2021/09/windows-11-reinstall.jpg)


Closure
Thus, we hope this article has provided valuable insights into Restoring Your System: A Guide to Reinstalling Windows 11. We appreciate your attention to our article. See you in our next article!