Rejuvenating Your System: A Comprehensive Guide to Windows 11 Reinstallation
Related Articles: Rejuvenating Your System: A Comprehensive Guide to Windows 11 Reinstallation
Introduction
With great pleasure, we will explore the intriguing topic related to Rejuvenating Your System: A Comprehensive Guide to Windows 11 Reinstallation. Let’s weave interesting information and offer fresh perspectives to the readers.
Table of Content
Rejuvenating Your System: A Comprehensive Guide to Windows 11 Reinstallation
Windows 11, Microsoft’s latest operating system, offers a plethora of enhancements and features designed to elevate the user experience. However, over time, software installations, accumulated data, and general system wear and tear can lead to performance degradation and instability. In such scenarios, a clean installation of Windows 11 can act as a powerful solution, revitalizing your computer and restoring its optimal functionality.
This comprehensive guide aims to demystify the process of reinstalling Windows 11, providing a step-by-step approach for both novice and experienced users. By understanding the various methods and considerations involved, users can confidently undertake this process, ensuring a smooth and efficient system rejuvenation.
Understanding the Need for a Fresh Start
A Windows 11 reinstallation goes beyond simply deleting files and reinstalling the operating system. It offers a complete reset, eradicating any lingering issues that might be hindering performance. These issues can range from:
- Software conflicts: Multiple applications vying for resources can lead to system instability, crashes, and slowdowns. A clean installation removes these conflicts by providing a fresh environment for software to operate in.
- Malware and virus infections: Persistent malware can hinder system performance, compromise security, and even lead to data loss. A fresh installation eliminates these threats, safeguarding your system from future attacks.
- System errors: Corrupted system files or registry entries can lead to unpredictable behavior and errors. A clean installation replaces these components with fresh versions, ensuring a stable and reliable operating system.
- Performance degradation: Over time, accumulated data, temporary files, and unused programs can clog up storage space and slow down system performance. A clean installation removes these unnecessary files, freeing up resources and boosting speed.
- Upgrading from an older version: If upgrading from an older operating system, a clean installation can ensure a smoother transition and eliminate potential compatibility issues.
Methods for Reinstalling Windows 11
There are two primary methods for reinstalling Windows 11:
1. In-Place Upgrade:
This method involves reinstalling Windows 11 over the existing installation, preserving user data and settings. It is a simpler and faster option, suitable for users who do not want to lose their files and configurations.
2. Clean Installation:
This method involves formatting the hard drive and installing a fresh copy of Windows 11. It offers a complete system reset, eliminating any existing issues and providing a blank slate for software installations. This option is recommended for users experiencing significant system problems or those seeking a completely fresh start.
Essential Preparations
Before embarking on the reinstallation process, several preparations are crucial to ensure a smooth and successful operation:
- Backup your data: Regardless of the chosen method, backing up all important data is paramount. This includes files, documents, photos, videos, and any other crucial information stored on your computer. Consider using external hard drives, cloud storage services, or other reliable backup solutions.
- Gather necessary drivers: If performing a clean installation, gather the necessary drivers for your hardware components. These drivers enable the operating system to communicate with and utilize your hardware effectively. You can usually download drivers from the manufacturer’s website.
- Prepare installation media: Depending on the chosen method, you may need a bootable USB drive or DVD containing the Windows 11 installation files. You can create this media using the Microsoft Media Creation Tool or download an ISO file from the official website.
- Disable antivirus software: Temporarily disable your antivirus software during the reinstallation process to avoid potential conflicts. Ensure you re-enable it after the installation is complete.
- Disconnect unnecessary peripherals: Disconnect any unnecessary peripherals such as external hard drives, printers, and USB devices to minimize potential conflicts during the installation process.
Step-by-Step Guide to Reinstalling Windows 11
1. In-Place Upgrade
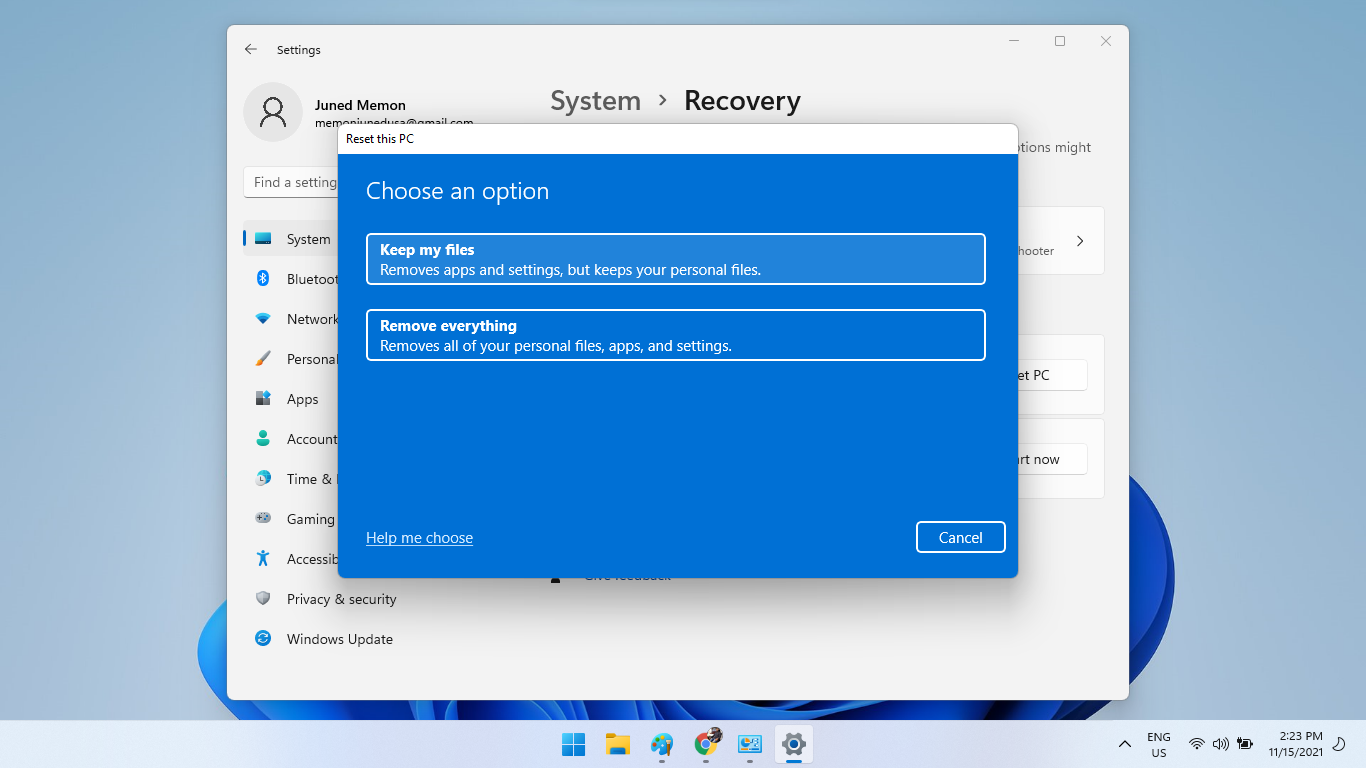
- Open Settings: Click the Windows icon in the taskbar and select "Settings."
- Navigate to System: In the Settings window, click on "System."
- Choose Recovery: In the System settings, select "Recovery."
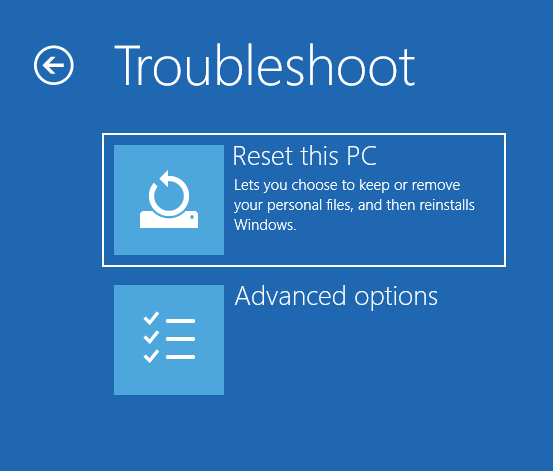
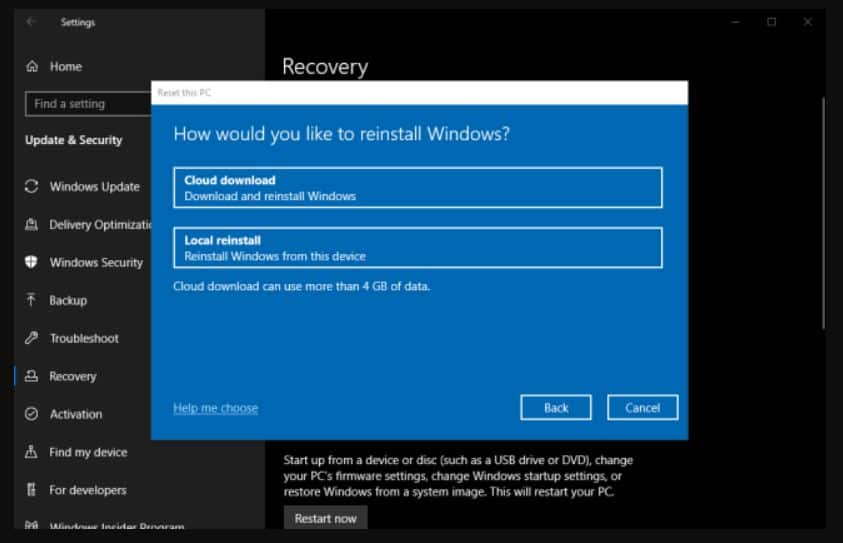
- Select "Reset this PC": Under the Recovery options, click on "Reset this PC."
- Choose "Keep my files": Select this option to preserve your personal files and settings.
- Follow the on-screen instructions: The process will involve downloading and installing the necessary files. Your computer will restart multiple times during this process.
2. Clean Installation
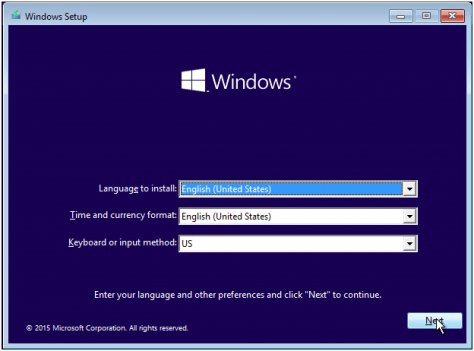
- Boot from installation media: Insert the bootable USB drive or DVD into your computer and restart it. Press the appropriate key (usually F12 or F10) to access the boot menu and select the USB or DVD drive.
- Select language and keyboard layout: Choose your preferred language and keyboard layout.
- Install now: Click on "Install now" to begin the installation process.
- Accept license terms: Read and accept the license terms.
- Choose custom installation: Select "Custom: Install Windows only (advanced)" to perform a clean installation.
- Select partition: Choose the partition where you want to install Windows 11. Note: This will erase all data on the selected partition.
- Install Windows: Click "Next" to begin the installation process.
- Activate Windows: After the installation is complete, activate Windows using a product key or a digital license.
- Install drivers: Install the necessary drivers for your hardware components.
- Install software: Install your desired applications and programs.
FAQs on Reinstalling Windows 11
Q: What happens to my data during a clean installation?
A: A clean installation erases all data on the selected partition. Therefore, backing up your data before proceeding is crucial.
Q: Can I reinstall Windows 11 without a product key?
A: You can reinstall Windows 11 without a product key if you have a digital license associated with your account. However, you may need to provide your Microsoft account credentials during the installation process.
Q: Will I lose my programs and settings during a clean installation?
A: A clean installation will erase all programs and settings. You will need to reinstall your desired programs after the installation is complete.
Q: Can I downgrade to Windows 10 after reinstalling Windows 11?
A: Downgrading to Windows 10 after a clean installation of Windows 11 is possible, but it may require specific steps and may not be supported in all cases.
Q: What should I do if I encounter errors during the reinstallation process?
A: If you encounter errors during the reinstallation process, refer to the troubleshooting guide provided by Microsoft or seek assistance from a technical support professional.
Tips for a Smooth Reinstallation
- Use a reliable backup solution: Ensure your backup solution is reliable and regularly tested to avoid data loss.
- Download drivers from the manufacturer’s website: Download the latest drivers for your hardware components from the manufacturer’s website to ensure compatibility and optimal performance.
- Verify system requirements: Ensure your computer meets the minimum system requirements for Windows 11 before proceeding with the installation.
- Consider using a bootable USB drive: Using a bootable USB drive for the installation process can be more convenient and reliable compared to using a DVD.
- Disable unnecessary peripherals: Disconnect any unnecessary peripherals to minimize potential conflicts during the installation process.
- Create a system restore point: Create a system restore point before starting the reinstallation process to provide a point of recovery if needed.
- Use a clean installation for major issues: If you are experiencing significant system problems, a clean installation is generally recommended to address underlying issues.
Conclusion
Reinstalling Windows 11 can be a powerful tool for rejuvenating your computer and restoring optimal functionality. By understanding the various methods, preparations, and considerations involved, users can confidently undertake this process, ensuring a smooth and efficient system reset. Whether seeking to resolve performance issues, eliminate malware threats, or simply enjoy a fresh start, a Windows 11 reinstallation can provide a revitalized and optimized computing experience. Remember to always prioritize data backup and follow the steps outlined in this guide for a successful and hassle-free reinstallation process.
![Reinstall Windows 11 With 2 Easy Steps [Clean Install]](https://cdn.windowsreport.com/wp-content/uploads/2021/09/windows-11-reinstall.jpg)
![[GUIDE] How to Reinstall Windows 11 Very Easily & Quickly (Download) - YouTube](https://i.ytimg.com/vi/vsScvaNXQa4/maxresdefault.jpg)
![[Guide] How to Reinstall Windows 11 - Howtoedge](https://www.howtoedge.com/wp-content/uploads/2021/08/Guide-Reinstall-Windows-11.png)

Closure
Thus, we hope this article has provided valuable insights into Rejuvenating Your System: A Comprehensive Guide to Windows 11 Reinstallation. We thank you for taking the time to read this article. See you in our next article!