Navigating Windows 11 with Ease: A Comprehensive Guide to Quick Settings
Related Articles: Navigating Windows 11 with Ease: A Comprehensive Guide to Quick Settings
Introduction
In this auspicious occasion, we are delighted to delve into the intriguing topic related to Navigating Windows 11 with Ease: A Comprehensive Guide to Quick Settings. Let’s weave interesting information and offer fresh perspectives to the readers.
Table of Content
Navigating Windows 11 with Ease: A Comprehensive Guide to Quick Settings

Windows 11 introduces a streamlined approach to system management through its intuitive Quick Settings menu. This centralized hub grants users swift access to commonly used system controls, enhancing productivity and simplifying everyday interactions with the operating system.
Understanding the Quick Settings Menu
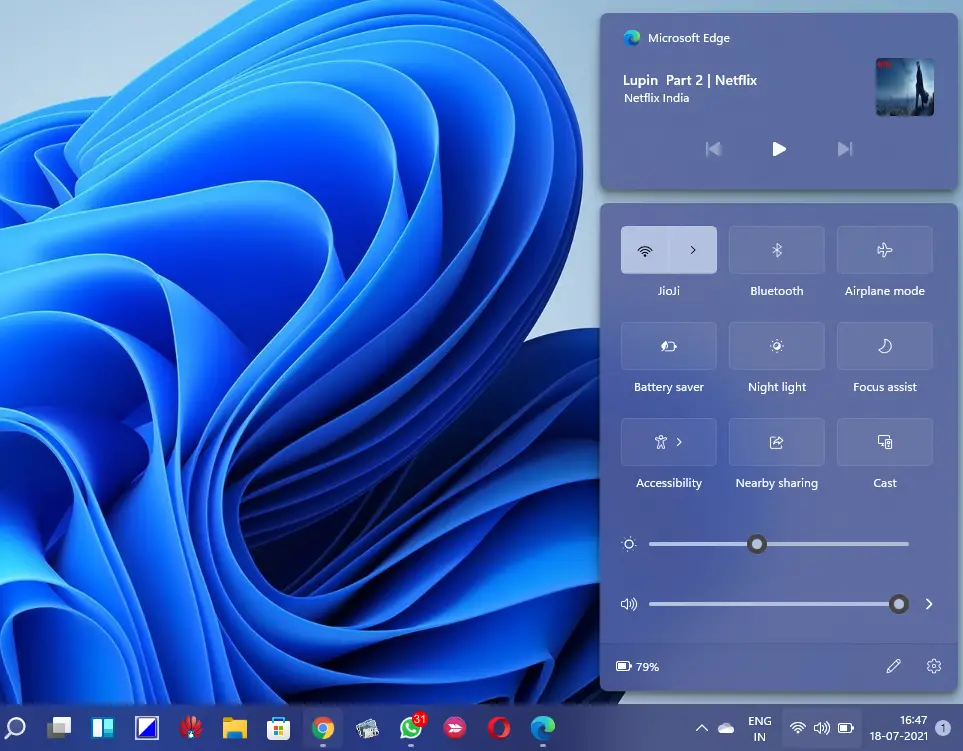
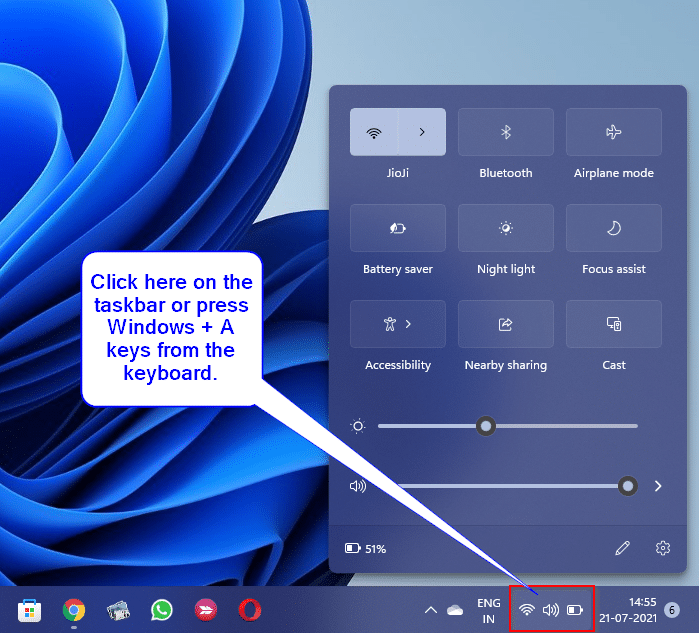
The Quick Settings menu is a dynamic panel located at the bottom right corner of the Windows 11 taskbar. Accessed by clicking the small icon resembling a network signal, it offers a visually appealing and efficient way to toggle essential system features and settings.
Key Features and Functionality
The Quick Settings menu provides a comprehensive range of functionalities, enabling users to:
- Adjust Brightness: Quickly adjust screen brightness levels to suit varying lighting conditions.
- Control Volume: Effortlessly manage system volume without navigating through menus.
- Toggle Airplane Mode: Instantly disconnect from wireless networks for privacy or in environments where wireless signals are prohibited.
- Manage Wi-Fi and Bluetooth Connections: Connect to available Wi-Fi networks or pair Bluetooth devices with a single click.
- Activate Night Light: Reduce blue light emissions for improved eye comfort during nighttime usage.
- Access Focus Assist: Minimize distractions by enabling Focus Assist, which silences notifications and alerts.
- Manage Battery Saver: Extend battery life by activating Battery Saver mode, which reduces energy consumption.
- Control Location Services: Enable or disable location services for applications requiring access to your location data.
- Access Project Settings: Launch settings related to specific applications or features.
Customization and Personalization
Windows 11 empowers users to personalize the Quick Settings menu to match their individual preferences and workflow. The menu allows users to:
- Reorder Tiles: Rearrange tiles based on frequency of use, creating a customized layout for optimal accessibility.
- Add or Remove Tiles: Add tiles for frequently used settings or remove tiles for settings used less often.
- Customize Tile Appearance: Modify tile colors and icons to enhance visual appeal and create a personalized experience.
Benefits of Using Quick Settings
The Quick Settings menu offers a multitude of benefits, making it an indispensable tool for Windows 11 users:
- Enhanced Productivity: Swift access to frequently used settings streamlines workflows, saving time and effort.
- Simplified System Management: Centralized control of essential system features reduces the need to navigate through complex menus.
- Improved User Experience: A visually appealing and intuitive interface enhances the overall user experience, making system management more enjoyable.
- Increased Efficiency: Quick access to settings enables users to make adjustments quickly and efficiently, maximizing productivity.
FAQs about Windows 11 Quick Settings
Q: How do I access the Quick Settings menu?
A: The Quick Settings menu is located at the bottom right corner of the Windows 11 taskbar. Click the small icon resembling a network signal to open the menu.
Q: Can I customize the Quick Settings menu?
A: Yes, you can customize the Quick Settings menu by rearranging, adding, removing, and customizing the appearance of tiles.
Q: How do I add a new tile to the Quick Settings menu?
A: To add a new tile, open the Quick Settings menu, click the "Edit" button, and select the tile you want to add.
Q: How do I remove a tile from the Quick Settings menu?
A: To remove a tile, open the Quick Settings menu, click the "Edit" button, and select the tile you want to remove.
Q: Can I change the order of tiles in the Quick Settings menu?
A: Yes, you can rearrange tiles by dragging and dropping them to your desired positions.
Tips for Using Quick Settings
- Utilize the Search Function: Use the search bar to quickly locate specific settings within the Quick Settings menu.
- Explore the "Edit" Button: Customize the Quick Settings menu to suit your individual needs and preferences.
- Keep the Menu Open: Leave the Quick Settings menu open for quick access to frequently used settings.
- Use Keyboard Shortcuts: Utilize keyboard shortcuts to access specific settings within the Quick Settings menu.
Conclusion
The Quick Settings menu in Windows 11 represents a significant step forward in user-centric design, offering a streamlined and intuitive approach to system management. By providing swift access to essential settings and enabling personalized customization, it empowers users to interact with their operating system efficiently and effortlessly. The Quick Settings menu is a powerful tool that enhances productivity, simplifies system management, and improves the overall user experience, making it an indispensable feature for Windows 11 users.

:max_bytes(150000):strip_icc()/windows-11-quick-settings-f1e98632cb2445e884e9e758a39d8852-81fd65059332429f8aee35c4de549f79.jpg)


Closure
Thus, we hope this article has provided valuable insights into Navigating Windows 11 with Ease: A Comprehensive Guide to Quick Settings. We hope you find this article informative and beneficial. See you in our next article!