Navigating Windows 11 Troubles: A Guide to the Repair Tool and USB Drive Creation
Related Articles: Navigating Windows 11 Troubles: A Guide to the Repair Tool and USB Drive Creation
Introduction
With great pleasure, we will explore the intriguing topic related to Navigating Windows 11 Troubles: A Guide to the Repair Tool and USB Drive Creation. Let’s weave interesting information and offer fresh perspectives to the readers.
Table of Content
- 1 Related Articles: Navigating Windows 11 Troubles: A Guide to the Repair Tool and USB Drive Creation
- 2 Introduction
- 3 Navigating Windows 11 Troubles: A Guide to the Repair Tool and USB Drive Creation
- 3.1 Understanding the Windows 11 Repair Tool
- 3.2 Creating a Bootable USB Drive
- 3.3 Using the Windows 11 Repair Tool
- 3.4 FAQs: Addressing Common Questions
- 3.5 Tips for Successful Repair
- 3.6 Conclusion
- 4 Closure
Navigating Windows 11 Troubles: A Guide to the Repair Tool and USB Drive Creation
Windows 11, like any complex operating system, can encounter issues that disrupt the user experience. From system crashes and application failures to persistent error messages and slow performance, these problems can be frustrating and hinder productivity. Thankfully, Microsoft provides a dedicated tool to address these challenges: the Windows 11 Repair Tool.
This tool, accessed through a bootable USB drive, offers a comprehensive solution for resolving various Windows 11 problems. By booting your computer from the USB drive, you can access advanced repair options that can restore your system to a stable state, potentially avoiding the need for a full reinstallation.
Understanding the Windows 11 Repair Tool
The Windows 11 Repair Tool is a powerful diagnostic and repair utility that can be used to address a wide range of issues, including:
- Startup problems: Difficulty booting into Windows 11, encountering error messages, or system freezes during startup.
- System file corruption: Damaged or missing system files that can lead to application failures, instability, and crashes.
- Driver issues: Incompatible or outdated device drivers that cause hardware malfunctions or conflicts.
- Software conflicts: Conflicts between installed programs or applications that can disrupt system functionality.
- Malware infections: Viruses, trojans, or other malicious software that can compromise system security and performance.
The tool provides several repair options, allowing users to choose the most appropriate solution for their specific problem. These options include:
- Startup Repair: Automatically detects and repairs common startup issues, including corrupted system files and incorrect boot configurations.
- System Restore: Reverts the system to a previous point in time, restoring system files and settings to a known working state.
- Command Prompt: Provides access to advanced command-line tools for troubleshooting and repair tasks.
- Reset this PC: Reinstalls Windows 11 while preserving personal files or removing all data, depending on the user’s choice.
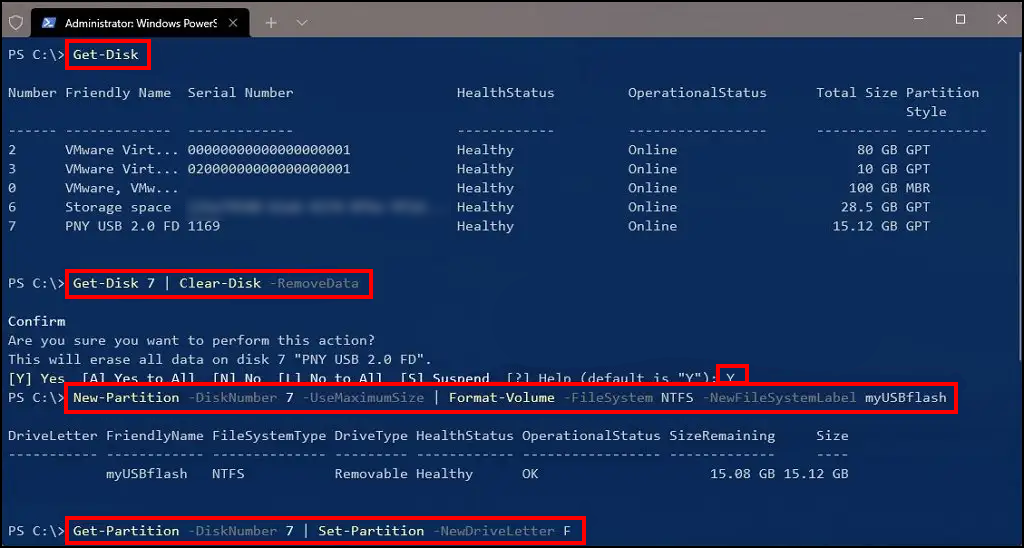
Creating a Bootable USB Drive
To access the Windows 11 Repair Tool, you must first create a bootable USB drive. This process involves downloading the necessary files from Microsoft and transferring them to a formatted USB drive. Here’s a step-by-step guide:
- Download the Windows 11 Installation Media: Visit the official Microsoft website and download the Windows 11 Installation Media tool. This tool will help create a bootable USB drive containing the necessary files for the Repair Tool.
- Prepare the USB Drive: Insert a USB drive with sufficient storage space (at least 8GB) into your computer. Ensure the drive is empty or backed up as the formatting process will erase all data.
- Run the Installation Media Tool: Open the downloaded tool and follow the on-screen instructions. Select "USB flash drive" as the media type and choose the USB drive from the list.
- Download and Transfer Files: The tool will download the necessary Windows 11 files and transfer them to the selected USB drive. This process may take some time, depending on your internet speed.
- Verify and Eject: Once the process is complete, verify that the USB drive is bootable by attempting to boot from it. Eject the drive safely when finished.
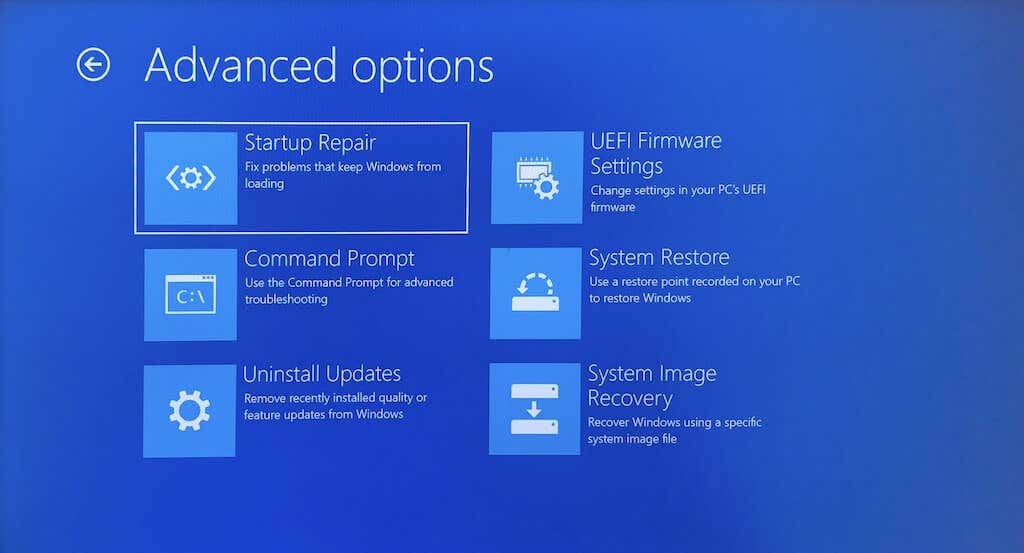
Using the Windows 11 Repair Tool
Once the bootable USB drive is created, you can use it to access the Repair Tool. Here’s how:
- Restart Your Computer: Restart your computer and access the BIOS settings by pressing the appropriate key (usually F2, F10, or Delete) during the boot process.
- Set Boot Order: In the BIOS settings, navigate to the Boot Order section and prioritize the USB drive as the first boot device. Save the changes and exit the BIOS.
- Boot from USB Drive: The computer will now boot from the USB drive. You will be presented with the Windows 11 setup screen.
- Select Repair Options: Choose the "Repair your computer" option from the bottom-left corner of the screen.
- Select Repair Tool: Depending on your specific issue, choose the appropriate repair option from the available choices.
FAQs: Addressing Common Questions
Q: Can I use the Windows 11 Repair Tool on any computer?
A: No, the Repair Tool is specifically designed for Windows 11 computers. It cannot be used on other operating systems.
Q: Will the Repair Tool delete my files?
A: The Repair Tool offers various options. Some options, like System Restore, may not delete your files, while others, like Reset this PC, may require you to choose whether to keep your files or erase them.
Q: What if the Repair Tool doesn’t fix my problem?
A: If the Repair Tool fails to address the issue, you may need to consider other solutions, such as a clean installation of Windows 11 or seeking professional help.
Q: Can I use the Repair Tool to upgrade from Windows 10 to Windows 11?
A: No, the Repair Tool is not designed for upgrading operating systems. It’s solely for repairing existing Windows 11 installations.
Q: Is it safe to use the Windows 11 Repair Tool?
A: The Repair Tool is a legitimate Microsoft tool and is generally safe to use. However, it’s always recommended to back up your important data before using any repair tool.
Tips for Successful Repair
- Backup Your Data: Before using the Repair Tool, create a backup of your important data to avoid losing valuable files.
- Check for Updates: Ensure your computer is running the latest Windows 11 updates before using the Repair Tool.
- Understand the Options: Carefully review the available repair options and choose the one that best suits your situation.
- Consult Microsoft Support: If you’re unsure about the repair process or encounter difficulties, contact Microsoft support for assistance.
- Consider Professional Help: If the Repair Tool fails to resolve the issue, consider seeking professional assistance from a certified technician.
Conclusion
The Windows 11 Repair Tool is a valuable resource for users facing issues with their Windows 11 installations. By providing a comprehensive set of repair options, the tool empowers users to troubleshoot and resolve various problems, potentially avoiding the need for a complete system reinstallation. Creating a bootable USB drive containing the Repair Tool is a simple process that can be completed by most users. By following the provided steps and utilizing the tool’s features wisely, users can restore their Windows 11 systems to a stable and functional state, ensuring a smooth and productive computing experience.
![How to Repair Windows 11 and Fix Corrupted Files [2024 Guide] - EaseUS](https://www.easeus.com/images/en/data-recovery/drw-pro/repair-windows-11.png)


Closure
Thus, we hope this article has provided valuable insights into Navigating Windows 11 Troubles: A Guide to the Repair Tool and USB Drive Creation. We appreciate your attention to our article. See you in our next article!