Best ideas, tips and information on windows 11 screenshot shortcut
Mastering File Transfers With Windows 11’s Robust Robocopy
Mastering File Transfers with Windows 11’s Robust Robocopy
Related Articles: Mastering File Transfers with Windows 11’s Robust Robocopy
Introduction
With great pleasure, we will explore the intriguing topic related to Mastering File Transfers with Windows 11’s Robust Robocopy. Let’s weave interesting information and offer fresh perspectives to the readers.
Mastering File Transfers with Windows 11’s Robust Robocopy
In the realm of efficient file management, Windows 11 offers a powerful tool often overlooked: Robocopy, short for "Robust File Copy." This command-line utility goes beyond simple file copying, providing advanced features for robust, reliable, and highly customizable file transfers. This article delves into the intricacies of Robocopy, exploring its capabilities, highlighting its benefits, and providing practical guidance for leveraging its full potential.
Understanding Robocopy’s Strengths:
Robocopy distinguishes itself from traditional file copying tools through its comprehensive feature set. Its strengths lie in:
Robustness: Robocopy is designed for reliability. It handles interruptions gracefully, resuming transfers from the point of failure. This makes it ideal for large, time-consuming transfers, ensuring data integrity even in the face of unexpected events.
Advanced Options: The utility boasts an extensive array of command-line options, allowing users to tailor transfers to specific needs. This includes options for mirroring directories, copying only modified files, skipping existing files, and much more.
Logging and Reporting: Robocopy generates detailed logs, providing insights into the transfer process. This includes information on copied, skipped, and failed files, along with timestamps and error codes. This granularity facilitates troubleshooting and analysis.
Network Optimization: Robocopy is optimized for network transfers, minimizing network traffic and improving transfer speeds. This is crucial for large file transfers across networks, ensuring efficient resource utilization.
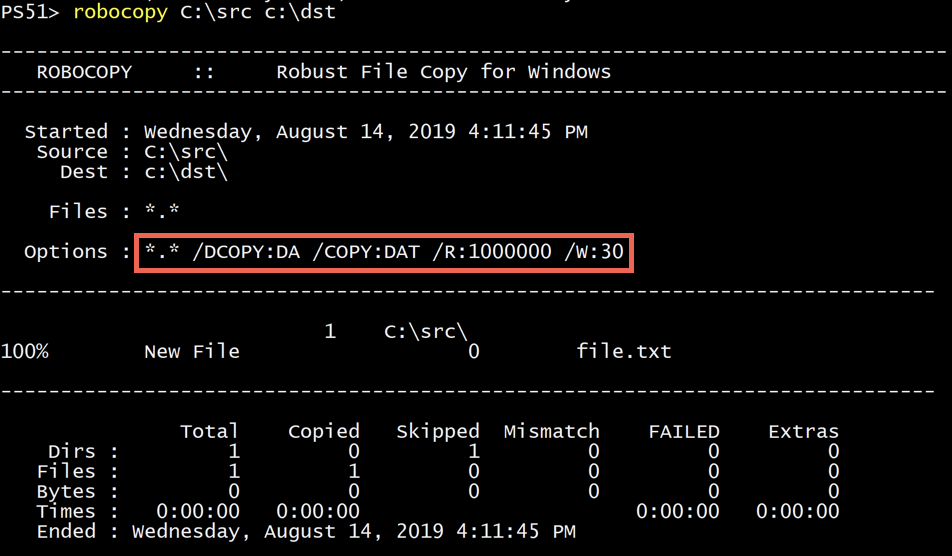
Robocopy in Action: A Practical Guide
To harness the power of Robocopy, understanding its syntax and options is essential. The basic Robocopy command structure follows this pattern:
robocopy <Source> <Destination> [Options]
: Specifies the source directory or file to be copied.
: Indicates the target directory where files will be copied.
[Options]: A series of optional parameters that modify the copying behavior.
Let’s illustrate Robocopy’s capabilities with a few practical examples:
/V: Verifies the copied files by comparing their contents with the source files.
Beyond the Basics: Advanced Robocopy Options
Robocopy’s versatility extends far beyond these basic examples. Advanced options allow for fine-grained control over the copying process, enabling users to address complex scenarios:
File Filtering and Exclusion: Options like /XF, /XD, and /IS enable the exclusion of specific files, directories, or file types from the copying process. This is crucial for selectively copying data, avoiding unnecessary transfers, and ensuring data integrity.
Time-Based Copying: Options like /MAXAGE and /MINAGE allow copying files based on their age, enabling the transfer of only recently modified files or files within a specific age range. This is particularly useful for backups and data archiving.
Error Handling and Retry Mechanisms: Options like /R, /W, and /Z provide robust error handling mechanisms. They allow retries for failed transfers, handle interruptions gracefully, and ensure data integrity even in the face of network issues.
Logging and Reporting: Options like /LOG and /L enable the generation of detailed logs, providing insights into the transfer process. These logs contain information on copied, skipped, and failed files, along with timestamps and error codes. This level of detail facilitates troubleshooting and analysis.
Network Optimization: Options like /MT, /NP, and /NDL optimize network transfers, minimizing network traffic and improving transfer speeds. This is particularly relevant for large file transfers across networks, ensuring efficient resource utilization.
Unveiling Robocopy’s Importance and Benefits:
The power of Robocopy lies in its ability to streamline and automate complex file transfer tasks. Its benefits extend across various scenarios:
Data Backup and Recovery: Robocopy is a valuable tool for creating backups of critical data. Its robust error handling and retry mechanisms ensure data integrity even in the face of unexpected events, making it a reliable choice for safeguarding valuable information.
Data Synchronization: Robocopy can be used to synchronize data between multiple locations, ensuring consistent data across different systems or networks. This is particularly useful for maintaining data consistency in collaborative environments or for replicating data across multiple servers.
Data Migration: Robocopy simplifies the process of migrating data from one system to another. Its ability to handle large file transfers and resume interrupted processes makes it ideal for migrating large data sets, ensuring data integrity and minimizing downtime.
System Administration: Robocopy is an indispensable tool for system administrators. It enables them to automate file transfers, manage data replication, and perform other administrative tasks efficiently, streamlining their workflow and improving operational efficiency.
Software Deployment: Robocopy can be used to deploy software packages across multiple systems, automating the process and ensuring consistency. This simplifies the software distribution process, reducing manual intervention and ensuring uniform deployment.
FAQs on Windows 11 Robocopy
1. How can I use Robocopy to mirror a directory structure?
To mirror a directory structure, use the /MIR option. This option ensures that the destination directory matches the source directory, including all subdirectories and files. For example:
robocopy C:SourceFolder D:DestinationFolder /MIR
2. How do I exclude specific files from being copied?
Use the /XF option to exclude files with specific extensions. For instance, to exclude files with the ".txt" and ".log" extensions:
4. What is the difference between /MIR and /E options?
The /MIR option mirrors the source directory to the destination, ensuring that the destination directory matches the source directory. This includes deleting files in the destination directory that are not present in the source directory. The /E option only copies files and subdirectories from the source directory to the destination directory.
5. How can I check the status of a Robocopy operation?
Robocopy provides detailed logs that can be accessed using the /LOG option. These logs contain information on copied, skipped, and failed files, along with timestamps and error codes. This information helps track the progress and identify any issues during the transfer.
6. How can I pause a Robocopy operation?
Robocopy does not offer a direct pause functionality. However, you can interrupt the operation by pressing Ctrl+C. The transfer will resume from the point of interruption when you restart the command.
7. Can I use Robocopy to copy files across networks?
Yes, Robocopy is designed for network transfers. It optimizes network traffic and improves transfer speeds, making it ideal for transferring large files across networks.
8. How can I use Robocopy to create a backup of my system?
Robocopy can be used to create backups of critical data. You can use the /MIR option to mirror the source directory to the destination, ensuring that the destination directory matches the source directory. You can also use the /MAXAGE option to create backups of only recently modified files, reducing the backup size and frequency.
Tips for Effective Robocopy Usage
Thoroughly Test: Before using Robocopy for critical tasks, test it with small sample data sets to ensure the desired behavior and validate the options used.
Utilize Logging: Always enable logging to monitor the progress and identify potential issues. Analyze logs to understand the transfer behavior and troubleshoot any errors.
Optimize for Network Transfers: For network transfers, use the appropriate options to minimize network traffic and improve transfer speeds. Consider using the /MT option for multi-threaded transfers to further enhance performance.
Leverage File Filtering: Use file filtering options to exclude specific files, directories, or file types from the copy process. This ensures that only the necessary data is transferred, improving efficiency and reducing potential errors.
Automate with Scripts: Create batch scripts or PowerShell scripts to automate Robocopy tasks, streamlining workflows and reducing manual intervention.
Conclusion:
Robocopy is a powerful and versatile tool within Windows 11, offering a robust and reliable solution for file transfer needs. Its comprehensive feature set, advanced options, and detailed logging capabilities make it an ideal choice for various scenarios, including data backup, data synchronization, data migration, system administration, and software deployment. By understanding its capabilities and utilizing its advanced options effectively, users can leverage Robocopy to streamline file transfers, improve data integrity, and enhance overall system efficiency.
Closure
Thus, we hope this article has provided valuable insights into Mastering File Transfers with Windows 11’s Robust Robocopy. We appreciate your attention to our article. See you in our next article!